
Tuesday, August 25, 2015


Docker 1.8 with td-agent 2.2.1 container
This is a quick guide on setting up td-agent container with Docker 1.8
- Create a directory to store your dockerfile and td-agent config file.
- Create a dockerfile as shown below
- Create td-agent.conf file as shown below
- Build the docker image
- Start elasticsearch container. As you can see from the td-agent.conf, the td-agent container will link to this elasticsearch container. Please note that this setup is not using any persistent storage mapping. You can refer to this link for more information on how to setup that mapping.
- Start your td-agent container
- Launch a hello-world to see if td-agent is forwarding log to elasticsearch container. Please note that Docker 1.8 add fluentd as one of the logging-driver. So this command will not work if you are using Docker with older version
- Use the following command to check if elasticsearch container is receiving log. You can check container ID or container name using docker ps -a
mkdir ~/td-agent-es && cd ~/td-agent-es
docker build -t td-agent-es .
docker run -d -p 9200:9200 -p 9300:9300 --name es elasticsearch
docker run -d -p 24224:24224 --link es:es --name td-agent td-agent-es
docker run --log-driver=fluentd --log-opt fluentd-address=[your-host-IP-address]:24224 hello-world
curl -XGET 'http://[your-host-IP-address]:9200/_all/_search?q=*'
Tuesday, August 18, 2015
Install jobber on CentOS 6.*
All the commands below are executed using root user
- Install go and git if you not already do so
- You need to specify workspace directory, this can be any path in your system. For this example, i use the following directory as the workspace - /home/amd/go
- Set the $GOPATH to this workspace directory
- Change directory to your workspace directory and run the following command to get the jobber files.
- As git supplied by CentOS 6 is version 1.7.1 and it cannot handle gopkg.in in package properly. If this is not down, you will encounter hang problem during compilation process. So you need to manually get the yaml.v2 package.
- Compile jobber package
- Before proceed to next step, install daemonized if not already do so.
- Install jobber
- Running the following command and you can see jobber service is running.
- To create a scheduled job, you need to create .jobber file under user home directory. jobber file are written in YAML format.
- Once it is created, you need to load the job
- You can check the log of the job using this command.
yum install go
yum install git
export GOPATH=/home/amd/go
go get github.com/dshearer/jobber
git clone --branch v2 https://github.com/go-yaml/yaml $GOPATH/src/gopkg.in/yaml.v2
make -C src/github.com/dshearer/jobber
yum install daemonize
make install -C src/github.com/dshearer/jobber
service jobber status
 ---
- name: DailyBackup
  cmd: backup daily
  time: 0 0 13
  onError: Stop
  notifyOnError: false
  notifyOnFailure: true
/usr/local/bin/jobber reload
/usr/local/bin/jobber log
Wednesday, August 12, 2015
Oracle 12c ORA-04030
If you encounter such error on Windows system, please don't just look at physical memory usage but also committed memory usage which includes physical memory and page file. You could be in such situation where there is still free physical memory but running out of pagefile.

To check on the metrics, you can go to Task Manager - Performance tab - Memory. Look at the value under Committed. In this screenshot below, the system commit limit is 50.3GB and current committed usage is 9.3GB.

To find out more on what processes that consume the committed memory, you can go to Details tab. By default Commit size column is not shown in this tab. To make it visible, you need to right click on any of column title and click Select columns.


Select Commit size

You can see the Commit size column now. Among all the processes, you can see that oravssw.exe actually has much larger Commit Size compare to Memory. And this is possible the culprit for this our-of-memory issue.

So what is oravssw.exe? It is Oracle VSS Writer and it is used by a lot of backup software to perform Oracle backup. Unfortunately, there is a bug for this software that cause memory leaking according to this note (Doc ID 1358570.1) from Oracle. There is no fix for this yet but only workaround which is to disable this service or perform service restart after backup. Although is not pretty but at least you don't need to bother with ORA-04030 issue again.
Friday, September 12, 2014
Control Who Can Use RDP Drive Redirection on Windows 2008 R2
Before we can proceed, you need to refer to this post to create 2 RDP listeners. Once you have multiple RDP listeners, the first step we need to do is to open Remote Desktop Session Host Configuration. You can do it by typing tsconfig.msc from run. As you can see in the screen captures below, there are actually 2 connections.

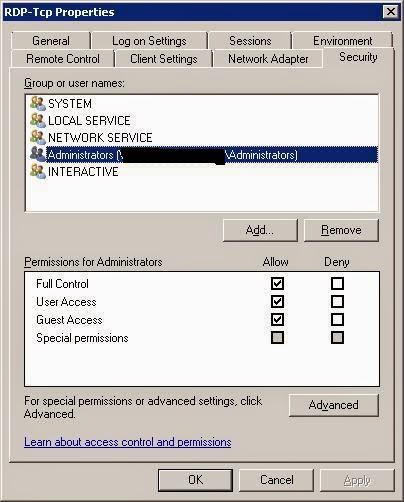
Assuming RDP-Tcp allow drive redirection and only Administrator can use it while RDP-Tcp-normalUser does not allow drive redirection and user1 can use it. So click on RDP-Tcp-normalUser and change the following:
Add in user1

Configure drive redirect, for this example, i disable all Redirection features.

Click on RDP-Tcp and make sure no user1 in this profile.
From client, you can do drive redirection by go to Local Resources tab and click More

A new Window let you select which drive to redirect

So if you login using Administrator with the default connection (default port 3389), you should see the mapped drive under Others.

If you login using user1 with the new connection (port 3390), you should not see any mapped drive.

Assuming RDP-Tcp allow drive redirection and only Administrator can use it while RDP-Tcp-normalUser does not allow drive redirection and user1 can use it. So click on RDP-Tcp-normalUser and change the following:
Add in user1
Configure drive redirect, for this example, i disable all Redirection features.
Click on RDP-Tcp and make sure no user1 in this profile.
From client, you can do drive redirection by go to Local Resources tab and click More
A new Window let you select which drive to redirect
So if you login using Administrator with the default connection (default port 3389), you should see the mapped drive under Others.
If you login using user1 with the new connection (port 3390), you should not see any mapped drive.
Create 2 RDP Listners in Windows 2008 R2
Remote Desktop Protocol (RDP) allow user to remotely control a remote PC. By default, there is only one RDP listener and so why i want to create more that that? My reason is because i want to create 2 RDP profiles where only one profile allow drive redirection. I will discuss more on how to achieve that in the other post and for this post, i will show you how to create 2 RDP listeners.
Open your Registry Editor by typing regedit on the run prompt. Once you in the Registry Editor, go to Computer\HKEY_LOCAL_MACHINE\SYSTEM\CurrentControlSet\Control\Terminal Server\WinStations\RDP-Tcp and right click and select Export.

Go to the path where you save the exported registry key and right click and select Edit

Change the highlighted part with a new name. Save the file.

Double click the registry file will add the new registry key.

Yo can now change the port number, in this case, i change it to 3390
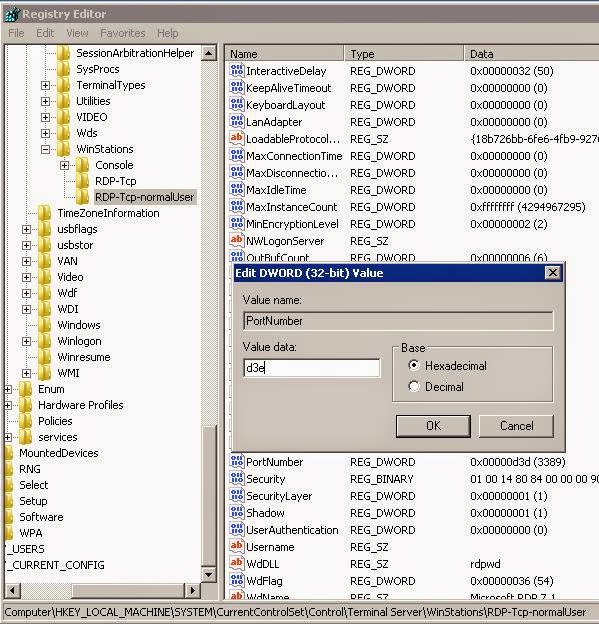
After change, you need to restart Remote Desktop Service

You can check using netstat -an to confirm new port (3390) is indeed listening.

You can now login using this new port

Friday, September 5, 2014
"Expecting to find valid JSON in request body..." curl for Windows
I was testing out curl command to access Openstack API under Windows environment and whenever i used the similar command which is working in Linux, i always encounter the following error message when do it on Windows.
The command and the error message:
Until i almost gave up on this problem, i found this link which have the following notes:
"Note: cURL commands that contain single quotes ( ' ) will fail on Windows. When possible, use double quotes ( " ) in place of single quotes. If a command requires both single quotes and double quotes, escape the double quotes with a backslash (for example: \" ) and replace the single quotes with double quotes."
By inserting escape character and replacing single quote with double quotes, the command can be completed successfully.
The command and the error message:
curl -i --insecure https:/10.10.2.9:5000/v2.0/tokens -X POST -H "Content-type:application/json" -H "User-Agent:python-keystoneclient" -d '{"auth":{"tenantName":"testTenant","passwordCredentials":{"username":"testUser","password":"passsword"}}}'

HTTP/1.1 400 Bad Request
Date: Fri, 05 Sep 2014 08:46:13 GMT
Server: Apache/2.4.7 (Ubuntu)
Vary: X-Auth-Token
Content-Type: application/json
Content-Length: 244
Connection: close

{"error": {"message": "Expecting to find valid JSON in request body. The server could not comply with the request since it is either malformed or otherwise incorrect. The client is assumed to be in error.", "code": 400, "title": "Bad Request"}}
Until i almost gave up on this problem, i found this link which have the following notes:
"Note: cURL commands that contain single quotes ( ' ) will fail on Windows. When possible, use double quotes ( " ) in place of single quotes. If a command requires both single quotes and double quotes, escape the double quotes with a backslash (for example: \" ) and replace the single quotes with double quotes."
By inserting escape character and replacing single quote with double quotes, the command can be completed successfully.
curl -i --insecure https://10.10.2.9:5000/v2.0/tokens -X POST -H "Content-Type:application/json" -H "User-Agent:python-keystoneclient" -d "{\"auth\":{\"tenantName\":\"testTenant\",\"passwordCredentials\":{\"username\":\"testUser\",\"password\":\"password\"}}}"

HTTP/1.1 200 OK
Date: Fri, 05 Sep 2014 08:58:42 GMT
Server: Apache/2.4.7 (Ubuntu)
Vary: X-Auth-Token
Content-Type: application/json
Content-Length: 2200
......
Subscribe to:
Posts (Atom)