So what left for me to configure is just host configuration, meaning the configuration on your PC that you want it to print through print server. Below are the steps taken to configure a Windows Vista system.
1. Go to Control Panel -> Printer
2. Click on Add a printer
 Click Add a printer
3. From the Add Printer windows, choose Add a local printer
 Choose Add a local printer
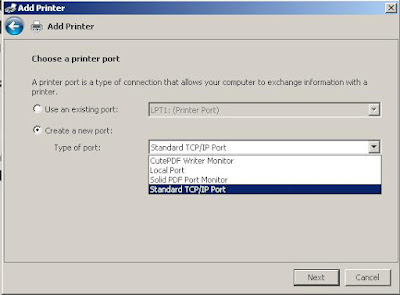
4. In the next windows, choose Create a new port and for the Type of port, select Standard TCP/IP port
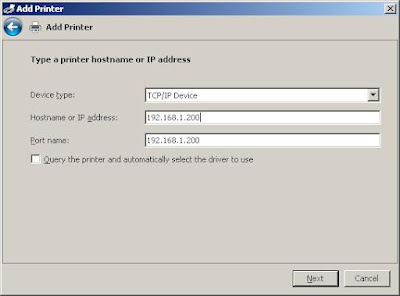
5. Next, select Device type as TCP/IP Device and also input the IP address for the print server, in this case, 192.168.1.200, the default.
6. The next windows shows the system is try to detect the TCP/IP port. This process might take a while.
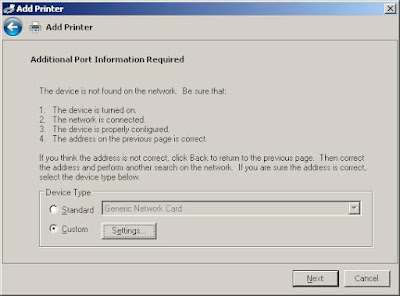
7. Next windows ask for additional port information. In this windows, under device type, select Custom and click on the Settings button.
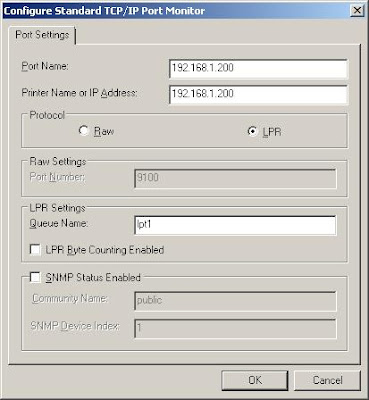
8. in this new windows, slect LPR as the protocol we going to use. For Queue Name under LPR Settings, type lpt1.
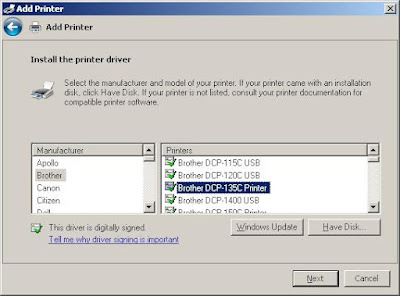
9. Next windows should ask you to install printer driver. Select the printer from the manufacturer printer list. If your printer is not in the list, you might need to click Have Disk to install the printer driver. In my case, the printer driver is already installed when i first purchase the printer.
10. Next step will ask you to enter printer name, you can also use the default name generated. If everything goes well, you should be able to see the last windows on sayaing you have successfully added the printer. you can choose to print the test page to confirm everything is ok.

5. Next, select Device type as TCP/IP Device and also input the IP address for the print server, in this case, 192.168.1.200, the default.

6. The next windows shows the system is try to detect the TCP/IP port. This process might take a while.
7. Next windows ask for additional port information. In this windows, under device type, select Custom and click on the Settings button.

8. in this new windows, slect LPR as the protocol we going to use. For Queue Name under LPR Settings, type lpt1.

9. Next windows should ask you to install printer driver. Select the printer from the manufacturer printer list. If your printer is not in the list, you might need to click Have Disk to install the printer driver. In my case, the printer driver is already installed when i first purchase the printer.

10. Next step will ask you to enter printer name, you can also use the default name generated. If everything goes well, you should be able to see the last windows on sayaing you have successfully added the printer. you can choose to print the test page to confirm everything is ok.